Guitar Action Height (2026): String Height Chart in mm
Guitar action height specs in mm at the 12th fret for Strat, Tele, Les Paul & acoustic. String height charts plus step-by-step saddle adjustment.

Guitar Action Height: The Complete Guide to Perfect String Height
Last updated: July 22, 2026 — factory specs and adjustment steps verified for electric and acoustic guitars.
Quick Answer: Guitar action height is the distance from the top of the fret to the bottom of the string, measured at the 12th fret. For electrics, aim for 1.6–2.0 mm on the high E and 2.0–2.5 mm on the low E; acoustics need roughly 2.0–2.5 mm (high E) and 2.5–3.0 mm (low E). Lower action is easier to play but more prone to buzz; higher action gives cleaner tone and better sustain.
Guitar action height, the distance between your strings and frets, is one of the most critical factors affecting playability, tone, and comfort. Whether you're fighting buzzing strings, struggling with high action that hurts your fingers, or simply want to optimize your guitar's feel, understanding and adjusting action height is essential knowledge for every guitarist.
In this comprehensive guide, we'll cover everything you need to know about guitar action height for both electric and acoustic guitars. You'll learn ideal measurements, step-by-step adjustment techniques, common problems and solutions, and how to find the perfect action height for your playing style. Action and neck relief go hand-in-hand — if you also need to adjust your truss rod, see our truss rod adjustment guide.
What is Guitar Action Height and Why Does It Matter?
Quick Answer: Guitar action height is the distance from the top of the fret to the bottom of the string, typically measured at the 12th fret. It affects playability, tone, sustain, and playing comfort. Lower action is easier to play but more prone to buzzing; higher action requires more finger pressure but produces cleaner tone.
Guitar action height refers to the vertical distance between your strings and the frets. This measurement directly impacts how much finger pressure is required to fret notes cleanly, how easy it is to bend strings, and whether your guitar buzzes or plays cleanly.
How Action Height Affects Your Playing
Low Action (Strings Close to Frets):
- Easier to press down strings with less finger pressure
- Faster playing and easier bending
- Ideal for lead playing and complex chord voicings
- More prone to fret buzz if too low
- Can limit dynamic range with aggressive picking
High Action (Strings Far from Frets):
- Requires more finger strength to fret notes
- Cleaner tone with less buzz potential
- Better for slide guitar and aggressive strumming
- Improved sustain and volume
- Can cause finger fatigue and intonation issues if too high
The Sweet Spot: Finding the ideal guitar action height balances playability with clean tone. This sweet spot varies based on your guitar type, playing style, string gauge, and personal preference.
Standard Guitar Action Height Measurements
Quick Answer: Electric guitar action at 12th fret: High E: 1.5-2.0mm (1/16"), Low E: 2.0-2.5mm (5/64"). Acoustic guitar action: High E: 2.0-2.5mm (5/64"), Low E: 2.5-3.0mm (7/64"). Acoustics need higher action for proper volume and tone.
🧮 Try Our Calculator: Get instant personalized action recommendations with our free Action Height Calculator - just enter your measurements and playing style.
Building a DIY kit? See our DIY guitar kit setup guide for kit-specific action height targets and common bridge alignment pitfalls.
Understanding standard measurements helps you evaluate your current setup and set proper targets.
Electric Guitar String Height (Standard Action)
| String | Low Action | Medium Action | High Action |
|---|---|---|---|
| High E (1st) | 1.2mm (3/64") | 1.6mm (1/16") | 2.0mm (5/64") |
| Low E (6th) | 1.6mm (1/16") | 2.0mm (5/64") | 2.4mm (3/32") |
Measured: At the 12th fret, from the top of the fret to the bottom of the string
Common for:
- Fender Stratocaster and Telecaster
- Gibson Les Paul and SG
- PRS, Ibanez, and most electric guitars
Acoustic Guitar Action Height (Standard Action)
| String | Low Action | Medium Action | High Action |
|---|---|---|---|
| High E (1st) | 1.8mm (5/64") | 2.4mm (3/32") | 3.0mm (1/8") |
| Low E (6th) | 2.4mm (3/32") | 2.8mm (7/64") | 3.2mm (1/8") |
Measured: At the 12th fret, from the top of the fret to the bottom of the string
Why Higher?
- Acoustic guitars need more string vibration for volume
- Increased clearance prevents buzzing from harder strumming
- Higher tension produces better tone from the soundboard
- Accommodates greater string amplitude without fret contact
With all these different specs for different guitar types, having a quick-reference guide can be invaluable when you're in the middle of a setup and need to double-check measurements.
How to Measure Guitar String Height Correctly
Accurate measurement is crucial for proper setup. Follow these steps:
Tools You'll Need
- Precision ruler or String Action Gauge (recommended)
- Capo (to check at first fret)
- Tuner like the Boss TU-3
- Good lighting to see measurements clearly
Step-by-Step Measurement Process
-
Tune your guitar to pitch
- Action measurements are meaningless if strings aren't at proper tension
- Use an accurate tuner for all six strings
-
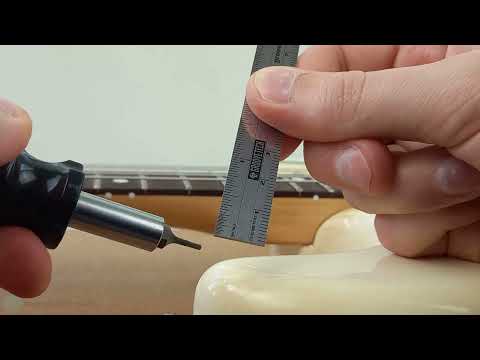
Position your measuring tool at the 12th fret
- Place ruler perpendicular to the fretboard
- Measure from the TOP of the 12th fret
- To the BOTTOM of each string (not center)
-
Record measurements for high E and low E strings
- These two strings give you the reference points
- Check middle strings if fine-tuning for advanced setup
-
Compare to target specifications
- Use the tables above as your baseline
- Adjust based on your playing style and preferences
▶ Watch: How to Adjust Guitar Action
This video demonstrates how to measure action at the 12th fret and make saddle adjustments on an electric guitar:
Click the thumbnail below to watch the full setup video on YouTube:
Common Measurement Mistakes
Mistake #1: Measuring from the fretboard surface instead of the fret top
Fix: Always measure from the crown (top) of the 12th fret
Mistake #2: Measuring with guitar out of tune
Fix: Proper string tension is required for accurate measurements
Mistake #3: Measuring at the wrong fret
Fix: Standard measurement is at 12th fret (middle of scale length)
Mistake #4: Measuring to the center of the string
Fix: Always measure to the bottom (underside) of the string
Step-by-Step: Adjusting Electric Guitar Action Height
Electric guitars offer straightforward action adjustment through the bridge saddles.
Preparation Steps
-
Set proper neck relief first
- Action adjustment comes AFTER truss rod adjustment
- See our Truss Rod Adjustment Guide for details
- Typical relief: 0.010" at 8th fret
-
Measure your current action
- Use a string height gauge for precision
- Record measurements for both E strings
- 💡 Use our Action Height Calculator to determine your target heights based on playing style
-
Install fresh strings (recommended)
- Old strings can give inaccurate measurements
- Consider trying D'Addario NYXL for stability
-
Tune to pitch and let strings settle
- New strings need stretching
- Retune several times
Fender-Style Bridge Adjustment (Strat/Tele)
Tools needed: Small Allen wrench (typically 1.5mm or .050")
-
Locate the saddle height screws
- Two small screws on each bridge saddle
- One on each side
-
Turn both screws clockwise to lower action
- Make equal turns on both sides
- Quarter-turn increments recommended
-
Turn both screws counter-clockwise to raise action
- Keep saddle relatively level
- Avoid extreme angles
-
Retune and remeasure
- String tension changes with height adjustments
- Re-check measurements
-
Test for buzz and playability
- Play across the entire neck
- Check all strings and positions
Gibson-Style Tune-o-Matic Bridge
Tools needed: Small flathead screwdriver or thumbwheel
-
Adjust the entire bridge height
- Two thumbwheels or screws, one on each side
- Controls overall bridge height
-
Make equal adjustments on both sides
- Keep bridge parallel to body
- Prevents intonation problems
-
Fine-tune individual saddles if needed
- Some Tune-o-Matic bridges have individual saddle adjustment
- Others have grouped saddles (three pairs)
Floyd Rose/Floating Bridge Systems
WARNING: Floating bridges require careful adjustment
-
Adjust overall bridge height first
- Use the bridge post screws
- Affects string angle and tuning stability
-
Fine-tune with saddle height screws
- Small Allen screws on each saddle
- Make small adjustments
-
Re-balance floating system
- Action changes affect spring/string tension balance
- May need to adjust spring tension
Acoustic Guitar Action Height: Ideal Specs by Brand
Acoustic guitar action height is measured at the 12th fret, just like electric guitars, but the target values are higher because acoustic strings need more room to vibrate and project. Here are the factory-recommended specs for the major brands:
Quick Answer: Most acoustic guitars play best with action between 2.0–2.4mm (5/64"–3/32") on the high E and 2.4–2.8mm (3/32"–7/64") on the low E at the 12th fret. Fingerstyle players often go lower; strummers and slide players go higher.
| Brand | High E (12th fret) | Low E (12th fret) | Notes |
|---|---|---|---|
| Taylor | 2.2 mm (5/64") | 2.8 mm (7/64") | Factory standard; adjustable saddle on many models |
| Martin | 2.4 mm (3/32") | 2.8 mm (7/64") | Slightly higher for projection; vintage models may be higher |
| Yamaha | 2.0 mm (5/64") | 2.5 mm (3/32") | Lower factory spec for playability |
| Guild | 2.4 mm (3/32") | 2.8 mm (7/64") | Similar to Martin |
| Seagull | 2.2 mm (5/64") | 2.6 mm (~3/32") | Balanced between comfort and projection |
These are starting points — your ideal acoustic guitar action depends on string gauge, playing style, and humidity conditions. Lighter gauges (11s or 12s) can handle lower action; heavier gauges (13s) benefit from slightly more clearance. For acoustic-only targets by playing style, see the acoustic guitar action height guide. For a complete acoustic setup walkthrough, see our Acoustic Setup Guide.
Step-by-Step: Adjusting Acoustic Guitar String Action
Acoustic guitar action adjustment is more complex and may require professional setup for major changes. See our guitar setup cost guide for typical pro-shop and chain-store prices.
Acoustic Guitar Action Adjustment Methods
Method 1: Saddle Adjustment (Most Common)
Skill Level: Intermediate to Advanced
-
Remove the bridge saddle
- Loosen strings completely
- Carefully pull saddle from bridge slot
- Note the orientation (marked side faces forward)
-
Sand the bottom of the saddle
- Use fine sandpaper (220-400 grit) on flat surface
- Remove material evenly across bottom
- Remove 0.5mm at a time, test fit frequently
-
Maintain proper saddle height
- Saddle should protrude 3-4mm above bridge
- Too low causes poor tone and reduced volume
- Never sand below minimum height
-
Reinstall and test
- Replace saddle in slot
- Restring and tune to pitch
- Remeasure action height
WARNING: This is permanent modification—you can't add material back. Consider buying a pre-cut replacement saddle instead.
Method 2: Neck Angle Adjustment (Advanced)
Skill Level: Professional (Luthier Recommended)
If saddle is already at minimum height and action is still too high:
- Neck angle may need adjustment (neck reset)
- This requires removing the neck and resetting the neck joint angle
- Strongly recommended to have a professional luthier perform this
- Cost: $200-500 depending on guitar
Method 3: Bridge Adjustment (Rare)
Some modern acoustics have adjustable bridges:
- Taylor guitars with adjustable saddles
- Some Martin models with adjustable systems
- Follow manufacturer specifications
Acoustic Guitar String Action: Common Issues and Solutions
Problem: Action Too High, Saddle Already Low
Diagnosis: Neck angle is insufficient or neck has too much relief
Solutions:
- Check neck relief first (see Truss Rod Guide)
- If relief is correct, neck angle needs adjustment (professional job)
- Consider replacing nut if it's cut too high
Problem: Fret Buzz Despite Proper Action Height
Diagnosis: Uneven frets or improper neck relief. For a full location-based diagnostic, see our guitar fret buzz troubleshooting guide.
Solutions:
- Check for high frets with fret rocker tool
- Verify proper neck relief (0.010-0.012" at 8th fret)
- May require professional fret leveling
Problem: Action Feels Different on Different Parts of Neck
Diagnosis: Nut slot height may be incorrect
Solutions:
- Check action at first fret (should be minimal)
- Nut slots may need deepening (professional recommended)
- Never deepen nut slots yourself without proper tools
Guitar String Action for Different Playing Styles
Your ideal action height depends heavily on your playing approach:
Fingerstyle and Classical Players
Recommended Action (Electric): Medium to Medium-High
Recommended Action (Acoustic): Medium to High
Why:
- Gentle playing style tolerates higher action
- Reduced buzz from complex fingerpicking patterns
- Better dynamic range for expression
- Clearer note separation
Typical Measurements (Electric):
- High E: 1.8mm, Low E: 2.2mm
Typical Measurements (Acoustic):
- High E: 2.5mm, Low E: 3.0mm
Rock and Blues Lead Players
Recommended Action (Electric): Low to Medium-Low
Why:
- Fast playing requires easy fretting
- String bending demands lower action
- Lead runs and solos benefit from speed
- Less finger fatigue during extended solos
Typical Measurements (Electric):
- High E: 1.2-1.5mm, Low E: 1.6-2.0mm
Metal and Shred Players
Recommended Action (Electric): Very Low
Why:
- Maximum speed for technical passages
- Fast alternate picking and sweep picking
- Two-hand tapping techniques
- Minimal finger resistance needed
Typical Measurements (Electric):
- High E: 1.0-1.2mm, Low E: 1.4-1.6mm
Note: Requires perfect neck relief, fret leveling, and precise setup
Slide Guitar Players
Recommended Action: High
Why:
- Slide needs clearance above frets
- Prevents fret contact with slide
- Allows open strings to ring clearly
Typical Measurements (Electric):
- High E: 3.0mm+, Low E: 3.5mm+
Typical Measurements (Acoustic):
- High E: 3.5mm+, Low E: 4.0mm+
Singer-Songwriter and Strummers
Recommended Action (Acoustic): Medium to Medium-High
Why:
- Strong strumming without excessive buzz
- Good volume and projection
- Comfortable for long playing sessions
- Balanced playability and tone
Typical Measurements (Acoustic):
- High E: 2.4mm, Low E: 2.8mm
Factors That Affect Optimal Action Height
String Gauge
Lighter Gauges (9-42, 10-46):
- Can handle lower action
- Less string tension means less vibration amplitude
- Popular for electric guitars
Heavier Gauges (11-49, 12-54):
- May need slightly higher action
- Greater string mass creates larger vibration
- Common for acoustic guitars and alternate tunings
See our Guitar String Gauges Guide for detailed recommendations, or the acoustic string gauges guide for acoustic tension charts by body size.
Neck Relief
Proper Relief (0.010"):
- Allows optimal action throughout neck
- Prevents buzz in middle frets
Too Much Relief:
- Forces higher action to prevent buzz
- Action feels high in middle positions
Too Little Relief (Backbow):
- Causes buzz even with medium-high action
- Must be corrected before lowering action
Fret Condition
Level, Crowned Frets:
- Allow lower action settings
- Consistent playability across neck
Worn or Uneven Frets:
- Require higher action to avoid buzz
- Eventually need professional leveling
Playing Technique
Light Touch:
- Can use lower action
- Less aggressive picking doesn't cause buzz
Heavy Attack:
- Needs higher action
- Aggressive picking creates more string movement
Troubleshooting Guitar Action Height Problems
Problem: Fret Buzz on Multiple Strings
Diagnosis: Action too low or neck relief incorrect
Solutions:
- Check neck relief first (most common cause)
- Raise bridge saddles 0.5mm at a time
- Test after each adjustment
- If buzz persists at medium action, check for high frets
Problem: High Action Hurts Fingers
Diagnosis: Action set too high for playing style
Solutions:
- Measure current action against standard specs
- Lower action gradually (0.5mm increments)
- Stop when you achieve comfortable feel without buzz
- Consider lighter string gauge
Problem: Buzz Only on Certain Frets
Diagnosis: High fret, worn fret, or nut problem
Solutions:
- Use fret rocker to identify high frets
- Professional fret leveling if uneven
- Check nut slot depth if buzz is in first position
- Single high fret can sometimes be carefully leveled
Problem: Action Feels Different After String Change
Diagnosis: Different string gauge or tension
Solutions:
- Verify you're using same gauge strings
- Allow new strings to settle and stretch
- Retune and remeasure after 24 hours
- Slight readjustment may be needed
Problem: Intonation Issues After Action Adjustment
Diagnosis: Action height changes affect intonation
Solutions:
- Always re-intonate after action changes
- Major action changes require saddle repositioning
- Check intonation at 12th fret harmonic vs. fretted note
- Adjust bridge saddle position forward/backward
Complete Guitar Setup: Proper Order of Adjustments
Action height is part of a complete setup system. Always adjust in this order:
The Correct Setup Sequence
-
Truss Rod (Neck Relief)
- Set proper neck curvature first
- Target: 0.010" at 8th fret
- See Truss Rod Adjustment Guide
-
String Height (Action) - YOU ARE HERE
- Adjust bridge saddle heights
- Set to playing preference
-
Pickup Height (Electric Guitars)
- Optimize tone and output
- See Stratocaster Pickup Height Guide | Telecaster Pickup Height Guide | Jazzmaster Pickup Height Guide
-
Intonation
- Fine-tune saddle positions
- Ensure accurate tuning across neck
-
Final Playability Check
- Test all positions and techniques
- Make minor tweaks as needed
🎸 Own More Than One Guitar?
If you own a Fender and a Gibson (or are thinking about adding one), the Complete Collection Bundle covers every model in your collection — Stratocaster, Telecaster, Les Paul, SG, Jazzmaster, Jaguar, and more. One download, every measurement you need at the workbench.
Get the Complete Collection — $49 →
Frequently Asked Questions (FAQ)
1. What is the ideal guitar action height?
Answer: Ideal guitar action at the 12th fret for electric guitars is 1.5-2.0mm on the high E string and 2.0-2.5mm on the low E string. Acoustic guitars need higher action: 2.0-2.5mm (high E) and 2.5-3.0mm (low E). Your personal playing style may require adjustments from these baselines.
2. How do I measure guitar string height?
Answer: To measure guitar action height, tune to pitch, place a ruler vertically at the 12th fret, and measure from the top of the fret to the bottom of the string. Use a precision ruler or string action gauge for accurate measurements in millimeters or 64ths of an inch.
3. Why is acoustic guitar action higher than electric?
Answer: Acoustic guitar string action must be higher because acoustics rely on string vibration to produce volume through the soundboard. Higher action prevents buzzing from the greater string amplitude needed for acoustic projection. Electric guitars use pickups, allowing lower action without volume loss.
4. What causes high action on a guitar?
Answer: High action is caused by bridge saddles set too high, excessive neck relief (too much bow), an improperly cut nut, or on acoustic guitars, incorrect neck angle. Check neck relief first, then adjust bridge height. Acoustic guitars may require saddle modification or professional neck reset.
5. Can action be too low?
Answer: Yes, action can be too low. When strings sit too close to frets, you'll experience fret buzz, notes that don't ring clearly, reduced sustain, and "choking out" on string bends. The lowest playable action depends on proper neck relief, level frets, and your playing technique.
6. How do I lower action on an acoustic guitar?
Answer: Lower acoustic guitar action by sanding the bottom of the bridge saddle. Remove the saddle, sand the bottom surface evenly on flat sandpaper, removing 0.5mm at a time. Test frequently. Never reduce saddle height below 3mm above the bridge. For major reductions, consult a professional luthier.
7. Does string gauge affect action height?
Answer: Yes, string gauge affects optimal action height. Heavier gauge strings have greater mass and vibration amplitude, often requiring slightly higher action to prevent buzz. Lighter gauges allow lower action settings. When changing string gauges significantly, expect to readjust your action height.
8. Should action be the same on all frets?
Answer: No, the gap between strings and frets naturally varies across the neck due to neck relief (slight concave curve). Action is measured at the 12th fret as a standard reference point. Proper neck relief creates slightly more clearance in middle frets, preventing buzz while maintaining playability.
9. How often should I adjust guitar action?
Answer: Adjust guitar action when you experience playability issues (too high or buzzy), after changing string gauges, following neck relief adjustments, or when changing playing styles. Many guitars maintain proper action for months or years with stable temperature and humidity.
10. Can I adjust action without affecting intonation?
Answer: No, changing action height affects intonation because it alters the string's speaking length and angle. Always check and adjust intonation after making significant action changes. Small action tweaks (less than 0.5mm) may not require intonation adjustment, but verify with a tuner.
11. What is the ideal guitar action height for beginners?
Answer: Beginners usually do best with medium-low action: around 1.8–2.0 mm on the high E and 2.2–2.5 mm on the low E for electrics, and slightly higher for acoustics. The goal is easy fretting without buzz; start medium, then lower gradually as technique and fretwork allow.
12. How do I lower action without buzzing?
Answer: First check neck relief with a feeler gauge at the 7th–8th fret and adjust the truss rod if needed. Then lower bridge saddles in small increments (0.25 mm), retune, and test every string across the neck. If buzz appears, you have reached the floor for your current fret level and technique.
13. Does action affect intonation?
Answer: Yes. Raising or lowering the saddle changes the string's speaking length and its angle over the bridge, which shifts intonation. Always recheck the 12th-fret harmonic against the fretted note after action changes and adjust saddle position forward if sharp or back if flat.
Essential Setup Tools for Measuring Action Height
Having the right tools makes action adjustment faster, more accurate, and less frustrating. Here are the most popular tools used by guitarists and technicians:
Setup Tool Comparison
| Tool | Best For | Price | Accuracy | Ease of Use |
|---|---|---|---|---|
| MusicNomad 6-Piece Setup Gauge | Complete setups | ~$25 | Excellent | Very Easy |
| Jim Dunlop String Height Gauge | Quick action checks | ~$16 | Good | Easy |
| StewMac String Action Gauge | Professional work | ~$10 | Excellent | Easy |
| D'Addario Multi-Tool | All-in-one setups | ~$16 | Good | Easy |
| Peterson StroboClip Tuner | Intonation work | ~$70 | Exceptional | Moderate |
Why We Recommend the MusicNomad Setup Gauge
The MusicNomad Precision 6-Piece Setup Gauge Tool Set is our top recommendation because it includes everything you need for a complete setup in one package:
- String action gauge for measuring height at 12th fret
- Truss rod gauge for neck relief measurement
- Pickup height gauge for setting pickup distance
- Multi-tool for saddle and truss rod adjustments
- Storage case to keep everything organized
- 24-page instructional booklet with setup tips
This all-in-one approach means you won't need to buy separate tools, and everything works together seamlessly.
Budget-Friendly Alternative: D'Addario Multi-Tool
If you're just starting out with guitar setup, the D'Addario Multi-Tool offers excellent value. It includes:
- Allen wrenches in multiple sizes
- Screwdriver bits (Phillips and flathead)
- String winder function
- All the hex keys needed for most bridges
While it doesn't include measurement tools, it handles all the adjustment work perfectly.
Professional Choice: StewMac String Action Gauge
For precision work, the StewMac String Action Gauge is the choice of professional luthiers:
- Zero starts at the edge for accurate fret-top measurements
- Clearly marked in both inches and millimeters
- Thin profile slides easily under strings
- Laser-etched markings won't wear off
Conclusion: Achieving Your Perfect Guitar Action Height
Mastering guitar action height adjustment is a fundamental skill that dramatically improves your playing experience. Whether you play electric or acoustic, fast lead lines or gentle fingerstyle, the right action height makes your guitar feel like an extension of yourself rather than an obstacle to overcome.
Remember these key principles:
- Start with proper neck relief before adjusting action
- Use standard measurements as guidelines, not absolute rules
- Adjust gradually in small increments (0.5mm steps)
- Test thoroughly after each change across the entire neck
- Re-intonate after significant action changes
The perfect action height is personal—what works for one player may feel terrible to another. Use the standard measurements in this guide as your starting point, then adjust based on your playing style, string gauge, and comfort level. With patience and experimentation, you'll find the sweet spot that makes your guitar a joy to play.
Related Guitar Setup Guides
Complete Setup Resources
- Factory vs Custom Setup: What Matters? - Should you keep factory specs or customize?
- Fender Neck Profiles Guide - Visual guide to C, V, D shapes and comfort
- Guitar Truss Rod Adjustment Guide - Set proper neck relief before adjusting action
- Guitar String Gauges Guide - Choose the right string gauge for your action
- Ultimate Stratocaster Setup Guide - Complete electric guitar setup
Specific Guitar Types
- Stratocaster Pickup Height Guide - Optimize tone after setting action
- Telecaster Pickup Height Guide - Telecaster pickup specs and adjustment
- Jazzmaster Pickup Height Guide - Offset pickup specs and adjustment
- Telecaster Setup Guide - Telecaster-specific action tips
- Jaguar Setup Guide - Short-scale action recommendations
Last updated: July 22, 2026


