How to Restring Fender Locking Tuners
Learn how to restring Fender locking tuners: identify rear wheels and Gotoh locking posts, fit strings, release stuck ends and check tuning after the change.
To restring Fender locking tuners, first find the part that actually locks the string. A rear thumbwheel and a self-locking post can look like small variations on the same idea, yet their release procedures differ. Identifying yours before removing the old strings makes the rest of the job much easier.
Quick answer: On Fender rear-thumbwheel tuners, detune the string, release the rear wheel, remove the old string, then thread the replacement through the post, pull out the slack, lock and tune. Gotoh Magnum Lock posts use a different release and self-locking procedure. An ordinary vintage split post has no string clamp. Match the installed hardware before choosing instructions.
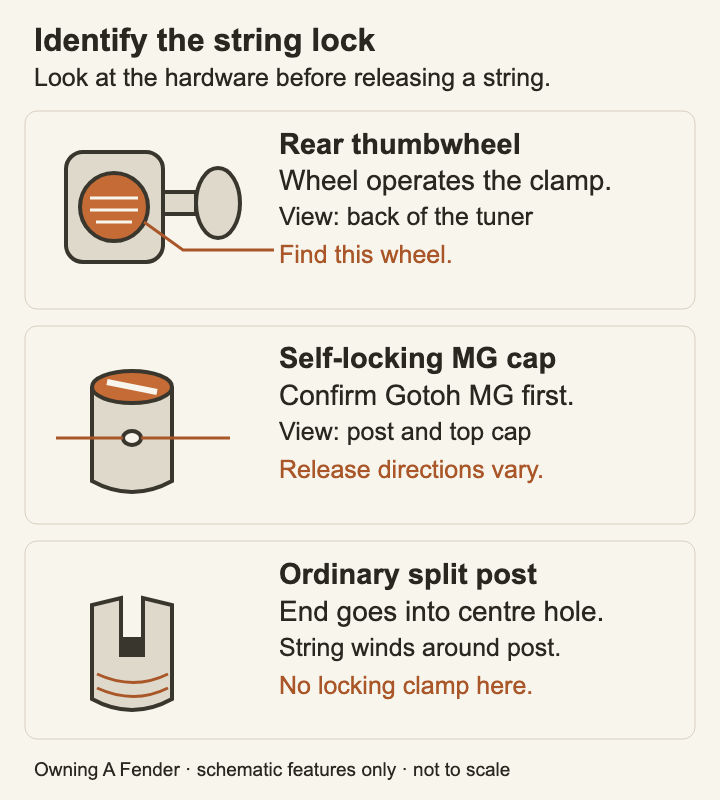
The drawings locate identifying features; they are simplified illustrations, not dimensions or a parts-compatibility chart.
In this guide
- Identify the lock and the other controls
- Prepare strings and the work area
- Restring rear-thumbwheel tuners
- Handle Gotoh self-locking posts
- Check tuning and troubleshoot
- Frequently asked questions
- Keep a useful string-change record
Identify your Fender locking tuner before turning anything
The lock is separate from the tuning button
The oval or rounded tuning button is the part you normally turn to change pitch. A string lock grips the string at the post; it does not freeze that button or select a musical note. You still tune the guitar after closing the lock.
A screw in the end of a tuning button, a mounting screw behind the headstock and a front bushing are different parts. Do not loosen them to release a string. If the entire machine moves against the wood, that is a mounting problem to investigate separately from restringing.
| What you can identify | Mechanism | Use this route |
|---|---|---|
| A dedicated knurled wheel behind the tuner | Rear-operated string clamp | Rear-thumbwheel procedure below |
| A slotted cap on the string post, verified as Gotoh MG | Self-locking Magnum Lock post | Exact MG manual and the scoped notes below |
| A conventional split post with a central hole for the string end | Non-locking vintage safety post | Fender's vintage-key winding instructions |
| Unfamiliar top screw, modified parts or an uncertain mechanism | Not identified | Find the part number/manual before releasing anything |
A vintage appearance does not identify the mechanism
Fender sells both ordinary vintage-style safety-post tuners and a Gotoh-made vintage-style locking set. Similar stamped housings and oval buttons do not make their stringing methods interchangeable.
Even the Gotoh name needs qualification: Magnum Lock MG and Magnum Lock-Trad MG-T are different systems. The latter uses a thumbscrew-style lock. Use the actual hardware and its instructions, rather than deciding from a guitar's year, price or headstock logo.
Check the bridge end too
This guide concerns the tuner end of a conventional electric-guitar string. A locking nut or double-locking bridge introduces another procedure; Fender has separate locking-tremolo instructions. Do not cut off a ball end simply because the tuners lock.
For ordinary string-through or top-loading hardware, photograph the existing route from bridge to tuner. Keep working string trees and retainers in that route unless the instructions for your exact assembly say otherwise. Staggered posts alone are not a reason to start removing parts.

The Fender workbook provides broader measurement guidance and a blank record for strings, tuning, bridge position and setup checks. The mechanism-specific restringing instructions are here in the free article.
Prepare for a Fender locking-tuner string change
Start with a known string set
For a routine replacement, keep the same gauges and tuning initially. That makes a new problem easier to trace than changing the strings, setup and tuning together. If you want a different feel, use the string-gauge recommendation guide to make that choice deliberately before you start.
“9s” usually describes the thinnest string, not every string in the packet. A typical 9–42 set starts at 0.009 inches, approximately 0.23 mm, and finishes at 0.042 inches, approximately 1.07 mm. Read the complete set specification, particularly when replacing a wound G or using an unusually heavy low string.
Keep each new string with its labelled envelope until it is needed. For multi-set packets, separate one complete set first. Ball-end colours and packaging conventions vary, so use the manufacturer's key rather than guessing from a colour you remember from another brand.
Set up the bench before opening a clamp
Use a stable, protected surface and support the guitar so that neither the headstock nor the controls carry its weight. Have a tuner, suitable string cutters and a container for the old strings ready. A manual winder can save turns while detuning; you do not need a powered driver to operate a small string lock.
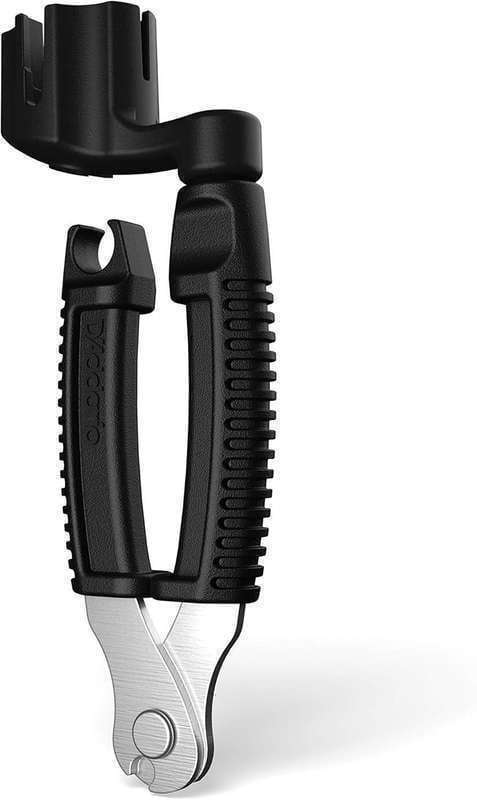
Choose one of the tuners below if you need one; they are alternatives. A Pro-Winder combines a winding handle and cutter, but it is not a tool for tightening the locking wheel. Existing tools that do the same job are sufficient.
 Buy on Amazon

Preserve a useful starting point
Before detuning, note the string set, intended tuning and any current symptom. Is one string slipping, or are you replacing a dull but otherwise working set? Photograph the post wraps and bridge resting position while the guitar is still tuned.
Changing one string at a time is a practical default for a routine replacement, particularly on a floating bridge. It limits how much of the existing arrangement you disturb at once. Removing the full set for cleaning is a separate choice: follow the bridge maker's support procedure, and do not use claw or saddle adjustments to compensate for temporarily missing string tension.
How to restring Fender rear-thumbwheel tuners
1. Detune, then release the old string
Turn the normal tuning button until the string is slack. Only then loosen the dedicated rear locking wheel by hand enough to release the string. Keep the wheel attached; removing small parts from a working tuner is unnecessary for a routine string change.
Guide the old string back through the post and out of the bridge's normal loading route. If its bent end catches, reposition that slack end instead of pulling harder against the finish. Keep the sharp tail pointed away from your face and collect it immediately.
2. Load the bridge and align the post hole
Seat the replacement at the bridge, following the original route through the correct saddle, nut slot and any string tree. Check that the ball end has reached its intended seat. A string caught partway through the bridge can feel tight while still being incorrectly installed.
Fender's Telecaster setup instructions give a clock-face orientation for the conventional six-in-line headstock: high E at 1, B at 2, G and D at 3, A at 4 and low E at 5, with the headstock tip at 12 and nut at 6. Those are post-hole orientations, not numbers of wraps. Do not copy that picture unchanged onto a reverse or different headstock.
3. Pull through, clamp and tune
Thread the string through the unlocked hole and draw out the slack by hand. Hold it steady while tightening the rear wheel to secure it, then use the tuning button to bring it to the intended pitch. Fender's locking-key method uses this pull-through-and-clamp sequence rather than the knot described for its standard keys.
Use your fingers on a thumbwheel; do not increase leverage with pliers. If the string will not grip with normal hand operation, stop and check the mechanism and string seating. More force is not a diagnostic test, and a button-end screw is not a substitute locking control.
4. Check the installation before trimming
Confirm that the string remains in its nut slot and saddle and follows a clear path to the post. It should not cross a neighbouring string or be trapped around a string tree. Leave the excess tail long enough to handle while you confirm the installation, keeping it controlled rather than waving loose above the guitar.
Once the string is seated and tuned, trim the free tail beyond the post without cutting into the post or the portion under tension. Do not build a stack of extra wraps to hide a clamp that is failing to hold. Repeat the same sequence for the remaining strings and recheck the whole set as you go.
Restringing Gotoh-style self-locking posts on a Fender
Verify MG before using the cap slot
These notes apply to the self-locking Gotoh Magnum Lock MG mechanism described in the SD91/SE701 operation manual, not every tuner with a screw on top. Fender's vintage locking set is Gotoh-made, but appearance alone does not establish which assembly is on a modified guitar.
MG locks through the string-loading and tuning action. Its cap slot can assist release; it is not an instruction to screw the cap down hard to clamp a new string. If the tuner has a rear MG-T thumbwheel, use its corresponding instructions instead.
Intact and broken strings need different release checks
For an intact string, detuning normally releases the MG lock. A broken or trapped remnant may need the manual's coin-assisted release. The illustrated conventional orientation releases counter-clockwise at the cap; left-handed or reverse versions use the opposite action. Open only enough to clear the string, keeping the cap on the post.
Do not use an arbitrary “lefty-loosey” rule before confirming orientation. A coin is mentioned because it engages the slot; it does not justify increasing force until an unidentified part moves. If the verified release action does not work, take the tuner to a repairer rather than filing the hole or dismantling the cap over the guitar.
Let the mechanism do the locking
The manufacturer's sequence is to centre the new string through the opening, pull through the slack and turn the tuning button in the tightening direction. The cap beginning to rotate indicates the string has locked. The SD91 MG instructions call for less than one post wrap and trimming only after tuning the set.
Gotoh's manual index separates MG from height-adjustable systems. Its MG-T overview identifies the separate thumbscrew design. If your replacement includes post-height adjustment, identify that assembly separately; a string change does not require experimenting with its height lock.
Check tuning and resolve a failed string change
Tune the whole guitar and let the strings settle
After installing the set, check every string against your intended tuning. Seat and gently settle new strings, retuning as needed; do not yank them sharply or try to stretch a string that is trapped. Fender's Stratocaster setup guidance describes gentle settling and repeated tuning.
With a floating bridge, changing one string's pitch can move the others. Make several ordinary tuning passes before judging the result. If the bridge now rests somewhere different after a gauge or tuning change, consult the Strat tremolo setup guide; closing the tuner clamps cannot set the spring balance.
Use one repeatable check
Play a familiar chord, then try an ordinary bend on one string. Recheck its open note with the same tuner and normal picking force. Make a fresh tuned starting point before a separate vibrato test, using a similar movement and release each time.
Write observations plainly: “B string returns sharp after the bend” is more useful than “the tuners are bad.” A pitch change by itself does not identify its cause. Keep the string set, tuning and action changes separate in your notes so the next check answers a specific question.
Troubleshoot the symptom you actually have
| Symptom | First check | Stop or change course when |
|---|---|---|
| Old string will not leave the post | String fully slack; correct lock and release route identified | The verified release binds or a cap starts separating |
| New string will not pass through | Clamp opening clear; correct string and post | String exceeds the assembly's published capacity; do not enlarge the hole |
| String slides through as you tune | Correct clamp operated; string passing through its gripping path | It repeatedly fails to hold after correct installation |
| Tuning button is unusually stiff | String route and mechanism identification | Resistance persists; do not alter unrelated screws to conceal it |
| String breaks repeatedly at the post | Same break location, trapped winding or visible damage | A burr or clamp defect needs repair |
| Tuning changes after bends or vibrato | Seating, nut symptoms and bridge return as well as tuner | A repeatable symptom remains after the installation is correct |
Do not remove a string tree, lubricate an unidentified clamp or adjust the truss rod simply because a new set needs settling. Those actions answer different problems. If you need help, bring the string packet, hardware photos and the short symptom record; they are more informative than a guessed diagnosis.
Match the replacement to your existing gauge
The following are ordinary electric-string options in 9–42 and 10–46 sizes. Pick the set that matches your intended setup, check all six gauges and verify the retailer's packet quantity. Locking tuners do not require a special “locking” string, and this shortlist is not a claim of hands-on comparative testing.
Replacement strings: choose your existing gauge



Fender locking-tuner questions
Do I need to wrap strings around Fender locking tuners?
For rear-thumbwheel tuners, pull the slack through, clamp and tune using the instructions for the assembly. Do not add several standard-post wraps by default. Gotoh's SD91 MG manual specifically calls for less than one wrap around its self-locking post.
Do locking tuners need special strings?
Usually, ordinary electric-guitar strings of the appropriate gauge and bridge-end type are suitable. Check the tuner manufacturer's string-hole capacity for unusual gauges. Locking tuners alone do not require removing the string's ball end.
How tight should the rear wheel be?
Use normal hand operation to secure the string; do not use pliers or invent a torque setting. If correct installation does not hold, investigate the clamp and string path rather than repeatedly tightening harder.
Why will my old string not come out?
Confirm that the string is slack and you have identified the actual lock. A rear-wheel clamp and an MG self-locking cap release differently. Follow the exact manual for a broken or trapped remnant, and stop if the verified release action binds.
Are vintage split-post tuners locking tuners?
An ordinary vintage safety post is not a string clamp: its central hole receives the string end and the string is wound around the post. Some vintage-looking tuners are locking designs, so check the mechanism rather than the housing style.
Can I change tuning while the tuner is locked?
Yes. The lock grips the string at the post; the tuning button still changes pitch. A large tuning change may affect bridge balance and the rest of the setup. A separate locking nut introduces additional instructions.
Should I remove every string at once?
One-at-a-time replacement is a practical starting point for a routine change, especially on a floating bridge. If you remove the full set for cleaning, follow the bridge's support instructions and preserve its parts and original settings.
Will locking tuners fix all tuning problems?
No. Nut binding, incorrectly seated strings, bridge movement and damaged parts can still affect tuning. Confirm a repeatable symptom after the strings are correctly installed before choosing a repair or buying replacement tuners.
Can I use a coin on every locking tuner?
No. The coin-assisted release described here belongs to verified Gotoh MG cap hardware, with orientation-specific directions. A rear thumbwheel or an unfamiliar top screw should not be treated as the same mechanism.
Keep the result useful for your next string change
Finish by saving the packet details, date, tuning and a clear photograph of the installed string route. Note whether the original complaint disappeared and which checks remain unresolved. The next time you restring, those observations give you a known starting point instead of another round of guesses.
The same principle applies when preparing a guitar for sale: distinguish a routine string change from replacement hardware, and keep the old parts if you replace them. The Guitar Price Estimate addresses valuation separately; a set of locking tuners does not establish a fixed increase in resale value.